Recently, I got the chance at work to work on a project of my own choice for a day. We call these 24h Sprints and they are usually a great way to discover new technologies. And that’s what I did with a colleague of mine. We wanted to build a chatbot with Dialogflow to help our internal company IT-support with a chatbot that could answer frequenty asked questions. My colleage, Tobias, and I had noticed that many colleagues post into the Slack IT-Support channel asking similar questions. These questions were along the lines of: If I make a call to Austria, how much does that cost? / How can I change my password when I am not connected to the company intranet?
So, why not save some valuable of time and let Geoffrey handle these questions?! You might ask youself, who is Geoffrey? Geoffrey is our chatbot and aid in all things related to IT-support. You want to know how to install a printer under Windows or Mac? Ask Geoffrey! You want to know about the details of your company mobile contract? Geoffrey knows the answer. And if I just want to see a random GIF from 9gag? Yep, Geoffrey can do that, too.
Dialogflow basics
To quote Wikipedia: Dialogflow is a Google-owned developer of human-computer interaction technologies based on natural language conversations. Basically, it is a tool to build intelligent agents that can communicate with a user. Among the customers of Dialogflow there are some big names like KLM and Dominos.
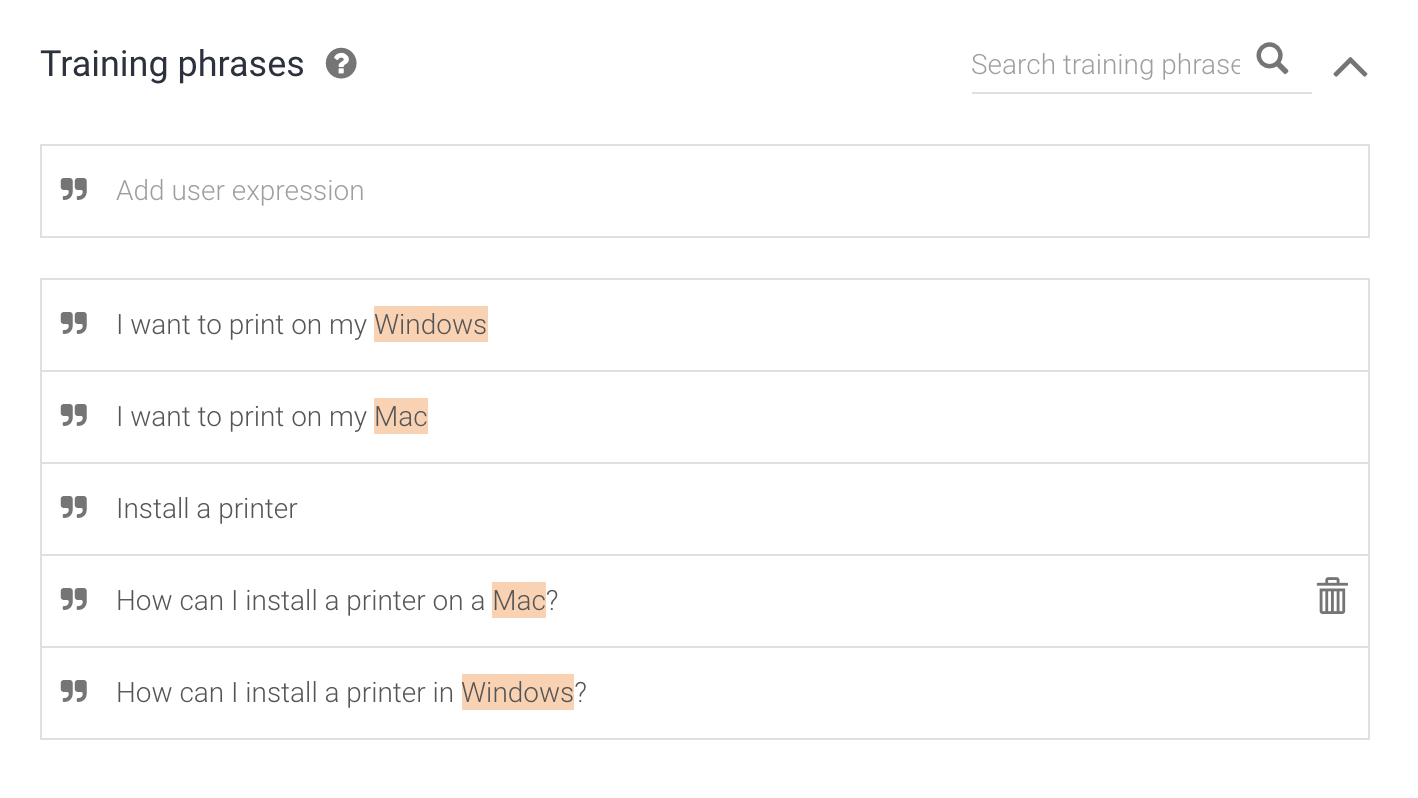
The underlying principle of Dialogflow is quite simple. The user gives an input and the agent tries to map that input to an intent. The mapping happens explicitly in Dialogflow, i.e. you have to specify sentences that match the intent for each intent. For example, the intent for installing a printer contains the following phrases:

These phrases do not have to match the actual users input phrases 100%, Dialogflow will be able to do the match when they are close enough. As you can see, Mac and Windows are marked in pink in the photo. This means, that Dialogflow was able to recognize these words as so called Entities. Entities are used to pick out specific information from a user input. This might be things like a given name, location, date, OS system anf many more. You can also create entities by yourself.
For many use cases you would want to add a response depending on an entity of the input. In our use-case it might make sense to reference different links. However, this is actually not possible with the standard default responses. This is where we have to start coding.
Fulfillment
In order to use fulfillment for you intents you have to enable webhook call for this intent in the intent settings in the bottom:

Once this is enabled you can skip to Fulfillment in the menu bar on the left of the page. In the bottom of the code you first have to define the function that handles your intent:
let intentMap = new Map();
intentMap.set('installPrinter', installPrinter);
Make sure your function and intent are named the exact same way as specified here!
Then, you can write your own function handling the intent:
function installPrinter(agent) {
    const OS = agent.parameters.OS;
    if(OS === "Windows") {
        agent.add(`You can find the manual to install a printer under ${OS} here 					https://www.laptopmag.com/articles/add-printer-windows-10`);
    } else if(OS === "Mac") {
        agent.add(`You can find the manual to install a printer under ${OS} here 					https://support.apple.com/kb/ph25081`);
    } else {
        agent.add(`Which OS do you use?`);
    }
  }
As you can see it is quite straightforward to add a response to your agent. Depending on the entity OS we return the suitable help link. Now you just have to deploy your agent in order to use it.
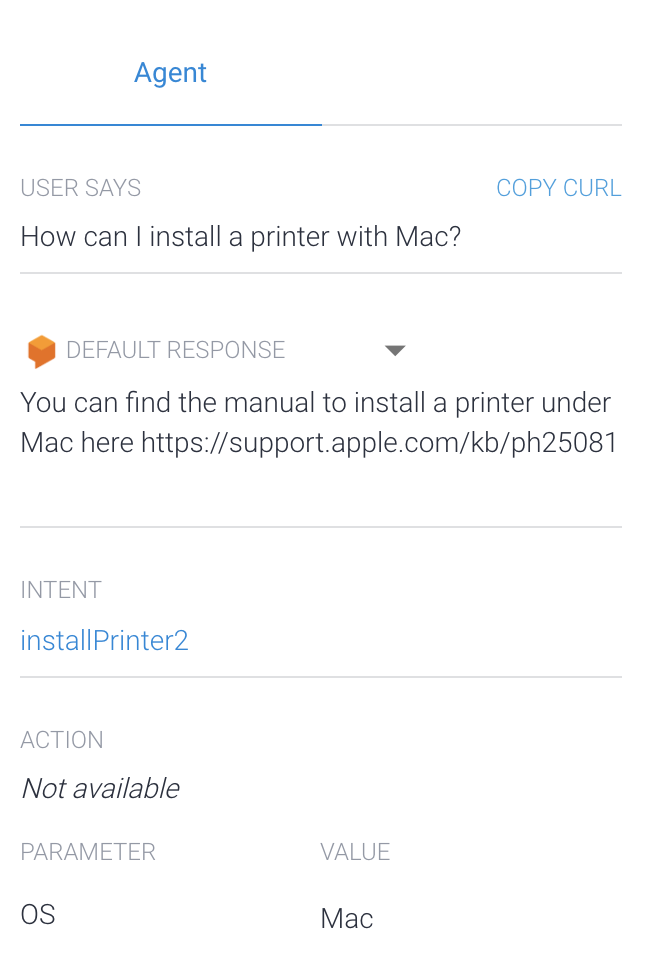
One of the best features in Dialogflow is that you can test everything out directly in the sidebar. Have a look at this:

You can see that the intent was correctly mapped to my intent installPrinter2 (I know not that original). You can also see that Mac was successfully identified as the operating system and the correct response based on the OS was given.
With the fulfillments you can basically specify the custom behaviour of your agent. And yes, I believe you are also supposed to have a lot of fun with it. See here for example our function for the random gifs provided by the giphy interface.
  function giphy(agent) {
      var api_key = "...";
      return new Promise((resolve, reject) => {
        requestLib.get(`https://api.giphy.com/v1/gifs/random?api_key=${api_key}`, (error, 			response, body) => {
        	console.log(body);
        	var url = JSON.parse(body).data.images.downsized.url.replace("media2", "i");

         	agent.add(new Image(url));
         	resolve();
       });
    });
  }
Integrations
For the proof-of-concept at work, we added our agent to Slack. In case you are not familiar with Slack: Slack is a tool for team-collaboration that offers messaging, video calls, file sharing and many more features. The integration is super easy and documented well here. Dialogflow offers a number of other integrations, such as Facebook Messenger, Google Assistant and many more. It also has a speech-to-text option, where you can talk to the agent and get a response based on your request.
We have found Dialogflow to be incredibly easy to set up and there are many ways in which you can optimize your agent in order to take it to the next level and get it production ready.
I hope you liked this short report/tutorial on my first Chatbot. Feel free to ask any questions or share your work & opinion in the comment section down below.